Today's Tech Tuesday is brought to you by Samuel Hardie, a PB member who wanted to know how to change the bearings in a BB30 bottom bracket, and also, the.
Kit# 52289-1 06/17/14 ks mounting bracket kit installation instructions roadmaster, inc. 6110 ne 127th ave. vancouver, wa 98682 360-896-0407 fax 360-735-9300.

*This DIY involves removal procedures for the stock intake system and installation of the Simota Intake system. Do it at your own risk. Becareful with the MAF sensor.
ZX-14 Ninja Forums : ZX-14 Conference : ZX-14 HOW-TOs : Newbies' Guide to Fairing Removal.
Amazon.com: Dorman 741-637 Buick/Oldsmobile Front Driver Side Window Regulator with Motor: Automotive.
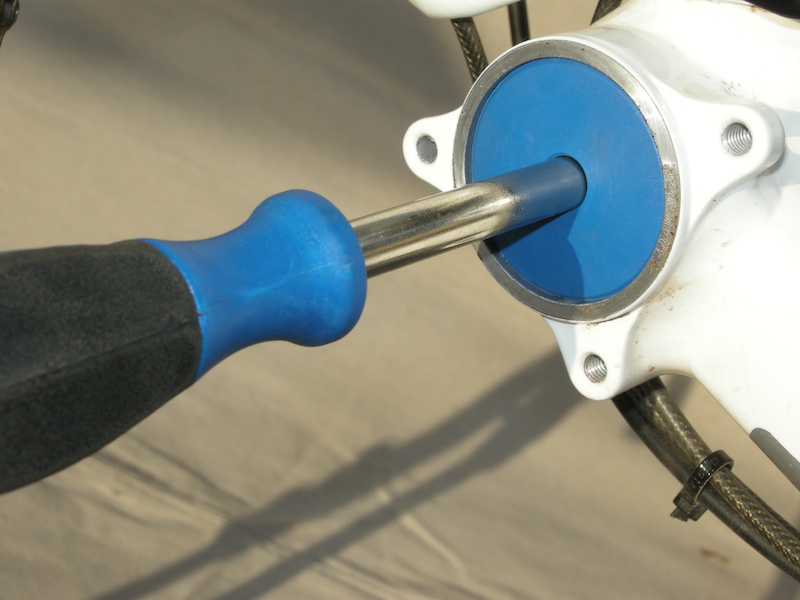
Today's Tech Tuesday is brought to you by Samuel Hardie, a PB member who wanted to know how to change the bearings in a BB30 bottom bracket, and also, the folks at Park Tool, who sent me bottom bracket tools for BB30 and for Shimano's PressFit BB system. Most modern press-in BB bearing systems use a cup or a housing that surrounds the actual bearing, which helps 'cushion' the ultra tight tolerances that frame makers would have to adhere to to press the bearings directly into the frame's BB shell. The cup also makes it easier to remove and replace the bearings, because it is a larger, easier-to-handle piece. Either way, removing and replacing the bearings in threadless bottom bracket shells is a simple process when armed with the proper tools. How To and How Not To Service a Press Fit BB There are a couple of methods to remove and replace pressed-in bottom bracket bearings: The first is the crude, but simple BMX method (also called, the Dad Method), that entails pounding out the old bearings with a framing hammer and a BFS (rather large screwdriver) and then pounding the new bearings back in place with a block of wood and a positive, winning attitude. Hey, it works in a pinch, but the probability that you will damage a bearing by pitting the races as you pound on the bearing is almost certain. We recommend the second method - using the Park BBT-30.3 tool and a simple-to-make press using a threaded rod to remove and install press-fit bottom bracket bearings. (Park Tool offers a ready-made press for this task.) The basic technique is a much-evolved version of the Dad Method that it is gentle on the bearings and far more precise when it comes to keeping all the bits aligned during the process. Before We Get Started, Meet the Key Players The Park BBT-30.3 removal tool has a stepped plastic guide that ensures the business end is aligned perpendicular to the bearing. The metal rounds are used to keep the bearings in alignment as they are being pressed into the frame. Assemble the press by tightening the washers between two nuts about five inches inboard. This forms a crude handle. Use a wrench on the opposite nut to press the bearings in. Step 1 - Remove the crankset. In this case, a 10mm Allen key is all that is necessary because Truvativ cranks are self-releasing. Note how all the bits go together and then set the assembly aside. Step 2 - Angle the removal tool into the bearing and then slide the guide in place. Feel around until you get the business end locked into the opposite bearing's ID. Step 3 - Before you start hammering, check the tool to be certain that the business end is aligned with the inner race of the bearing. It should not take much force to tap out the cups with the hammer. Step 4 - After the first bearing is pressed out, the larger flange on the stepped tool guide fits in to the empty BB shell. Step 5- Clean everything and then put a thin film of grease on the cups where the bearings will press in to prevent creaking. Step 6 - Slide one bearing assembly onto the threaded shaft and assemble the opposite bearing into place on the bottom bracket shell. Snug up the press finger tight and check that the cups are not canted in the frame before you start cranking with the wrench. Step 7 - Tighten the press slowly while checking that the bearings are perfectly aligned as they enter the shell. There should be no gaps around the circumference of the cup when you are done. (some BB shells have internal snap rings that the bearing assembly presses up against. In this case, you'll want a snug fit against the snap ring - don't overdo it.) Step 8 - Put a thin film of grease on the crank axle and spline. Reassemble the bits in the reverse order and torque the crank bolt to the maker's specification. The cranks should spin freely. If not, check the left-side for an end-play adjustment (Truvativ and Shimano have them) and readjust the bearing preload. Otherwise, check for a misaligned bearing or cup and reset that bearing if necessary. I have had 5 months of trouble with my PF30 equipped bike, all related to a poor manufacturing tolerance of the non-driveside cup had replaced the PF30 Bottom Bracket 5 times under warranty, and had the SRAM BB30 crankset inspected under warranty, and had to go the route of swapping pedals, back wheel, chain ring bolts, skewer, etc. to eliminate all possibilities every time the crank was turned the bike would click and creak. Eventually I had enough and after some further investigation we discovered the non-driveside PF30 side of the BB shell would 'overload' the PF30 cup and cause a brand new bearing to become graunchy and click. Remove the same cup and the bearing felt brand new the manufacturer (Specialized) was very good in upgrading me to their carbon fibre frame free of charge with only a 3 day turn around, after I stripped the bike, shipped back to them and they found the non-driveside cup was 0.2mm out of tolerance so any expectation that the delrin (nylon) cups will take up poor manufacturing tolerances is a myth, good tolerances are critical for BB30 and PF30 systems','url':'http://www.pinkbike.com/news/Tech-Tuesday-Overhaul-a-BB30-Bottom-bracket-2012.html','og_descr':'..and how to use Park Tool's BBT-30.3 bottom bracket installation tools
 RSS-канал
